Mail for OSX Configuration Howto
Apple Mail, also known as mail.app or simply Mail, is the full featured mail client which comes with OS X.
It is pretty and easy to use, but we don’t recommend it because it is not Free Software. However, it is more stable than Thunderbird, so for many it is the best choice when using OS X.
Before you configure Apple Mail, you need to decide if you will be using IMAP or POP. Apple Mail has very good IMAP support, so we suggest that most people use IMAP.
If you would like to use GPG with Apple Mail follow the instructions:
- Download the latest version of GNU Privacy Guard for your version of MacOS.
- Mount the GnuPG Mac OS X disk image and run the .mpkg installer.
- Download the latest version of GPGKeys.
- Decompress the .tar.gz and drag the GPGKeys file to your Applications folder.
- Run GPGKeys. From the “Key” menu, select “Generate”. A Terminal window will open. You can select the default options for each choice unless you know what you’re doing. When prompted, enter your real name, email address, and comment (handle). Once the key is generated you can quit Terminal.
- Download the Sen:te PGP plug-in for Mail.
- Run the “Install GPGMail” script.
- Open Mail. Everything should be working now. When composing a new message you’ll see a new checkbox that lets you choose your key and sign your message. When receiving a signed message you’ll be able to verify it.
How to configure Mail for OSX to download mail from A/I via POP protocol (with SSL support)
Note: screenshot for the POP protocol are in Italian but we hope you’ll be able to glimpse how to configure your Mail.app software anyway.
- Open Mail.app and click on Mail on the Menu bar. Then choose the Preferences tab.
- In the Account window click on the + sign below.
- In the popup window fill in your connection parameters as shown in the picture below
- Click on Server Settings to configure the outgoing mail server.
- Enter the Advanced tab and choose SSL
- Confirm the choice and Mail will be ready to download your messages from A/I servers via Pop/SSL
How to configure Mail for OSX to download mail from A/I via IMAP protocol (with SSL support)
First Time User
If you are already using mail, see Existing User below.
The first time you start mail, a dialog will appear requesting your account information:
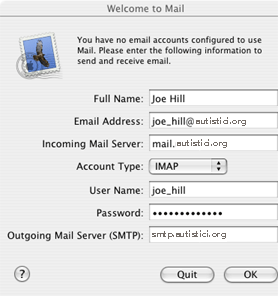
- Enter your name.
- Enter your full email address, i.e. joe_hill@autistici.org
- Incoming and SMTP servers should be “mail.autistici.org” and “smtp.autistici.org” respectively.
- Select “IMAP” account type
- Your username coincides with your email address, in this case, “[email protected]”.
- VERY IMPORTANT! If you plan to set up secure connections, do not enter your correct password, because it will be transmitted over the internet in “clear text”. Enter an incorrect password here. You will occasionally get a dialog box requesting your password when mail attempts to check your mail. Ignore it until you finish setting up the secure connections. Just hit cancel when these messages appear.
- Select “OK”.
An error message will appear, but just click continue: 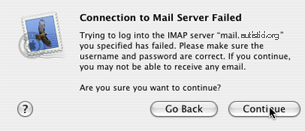
Existing User
This section is for adding an account profile if you have already been running Apple Mail. Users who just configured an account in the First Time User section should skip this.
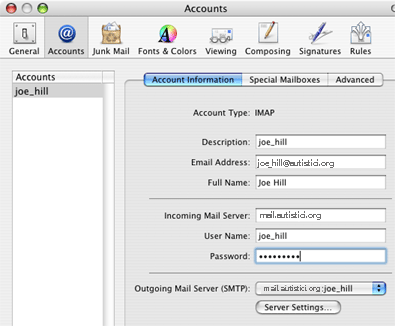
- Select menu item Mail > Preferences…
- Select the Accounts tab.
- Click on the + button in the lower-left corner of the screen.
- For account type, select IMAP.
- Enter a description (it can be anything, we suggest your email address).
- Enter your full email address, i.e. joe_hill@autistici.org.
- Your incoming mail server is mail.autistici.org
- Your user name is your A/I address.
Managing Account Settings
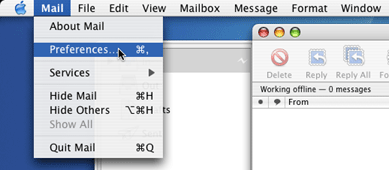
In this section, we assume you have the preferences window open. To do so:
- Select menu item Mail > Preferences…
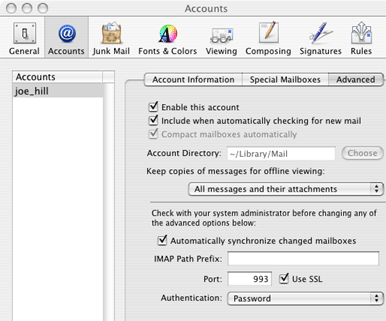
Setup Encryption For Receiving Mail
- Click on Accounts and select your A/I email account
- Now select the Advanced tab.
- Click “Automatically sychronize changed mailboxes”
- Click “Use SSL”
Setup Encryption For Sending Mail
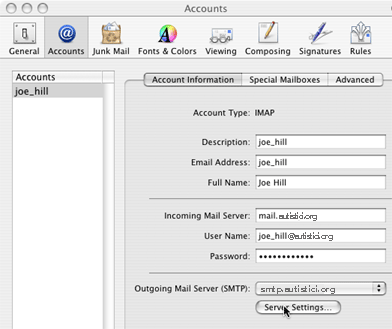 _ Click On “Account Information”
- Make sure that your SMTP server is set to smtp.autistici.org Note for existing mail users: You will need to select “Add Server” from the SMTP pull-down menu.
- If it is, select “Server Settings”
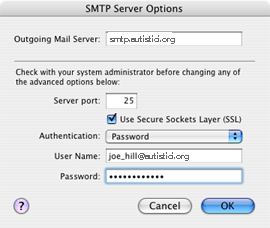
- For Server Port, put 25 or 465. We recommend using port 465, because many ISPs block port 25.
- Select Use Secure Socket Layer (SSL).
- Set Authentication to Password
- Now, enter your correct user name and your correct password.
- Select OK.
Complete the Setup!

Now, simply enter you correct password in the password box. Your password will be encrypted when sent to A/I server to send and receive email.
We wish to thank riseup for the inspiration for these howto.
JavaScript license information